Launching Kubernetes on New Nodes in an Infrastructure Provider
When you create an RKE or RKE2 cluster using a node template in Rancher, each resulting node pool is shown in a new Machine Pools tab. You can see the machine pools by doing the following:
- Click ☰ > Cluster Management.
- Click the name of the RKE or RKE2 cluster.
RKE Clusters
Using Rancher, you can create pools of nodes based on a node template. This node template defines the parameters you want to use to launch nodes in your infrastructure providers or cloud providers.
One benefit of installing Kubernetes on node pools hosted by an infrastructure provider is that if a node loses connectivity with the cluster, Rancher can automatically create another node to join the cluster to ensure that the count of the node pool is as expected.
The available cloud providers to create a node template are decided based on active node drivers.
Node Templates
A node template is the saved configuration for the parameters to use when provisioning nodes in a specific cloud provider. These nodes can be launched from the UI. Rancher uses Docker Machine to provision these nodes. The available cloud providers to create node templates are based on the active node drivers in Rancher.
After you create a node template in Rancher, it's saved so that you can use this template again to create node pools. Node templates are bound to your login. After you add a template, you can remove them from your user profile.
Node Labels
You can add labels on each node template, so that any nodes created from the node template will automatically have these labels on them.
Invalid labels can prevent upgrades or can prevent Rancher from starting. For details on label syntax requirements, see the Kubernetes documentation.
Node Taints
You can add taints on each node template, so that any nodes created from the node template will automatically have these taints on them.
Since taints can be added at a node template and node pool, if there is no conflict with the same key and effect of the taints, all taints will be added to the nodes. If there are taints with the same key and different effect, the taints from the node pool will override the taints from the node template.
Administrator Control of Node Templates
Administrators can control all node templates. Admins can now maintain all the node templates within Rancher. When a node template owner is no longer using Rancher, the node templates created by them can be managed by administrators so the cluster can continue to be updated and maintained.
To access all node templates, an administrator will need to do the following:
- Click ☰ > Cluster Management.
- Click RKE1 Configuration > Node Templates.
Result: All node templates are listed. The templates can be edited or cloned by clicking the ⋮.
Node Pools
Using Rancher, you can create pools of nodes based on a node template.
A node template defines the configuration of a node, like what operating system to use, number of CPUs, and amount of memory.
The benefit of using a node pool is that if a node is destroyed or deleted, you can increase the number of live nodes to compensate for the node that was lost. The node pool helps you ensure that the count of the node pool is as expected.
Each node pool must have one or more nodes roles assigned.
Each node role (i.e. etcd, controlplane, and worker) should be assigned to a distinct node pool. Although it is possible to assign multiple node roles to a node pool, this should not be done for production clusters.
The recommended setup is to have:
- a node pool with the etcd node role and a count of three
- a node pool with the controlplane node role and a count of at least two
- a node pool with the worker node role and a count of at least two
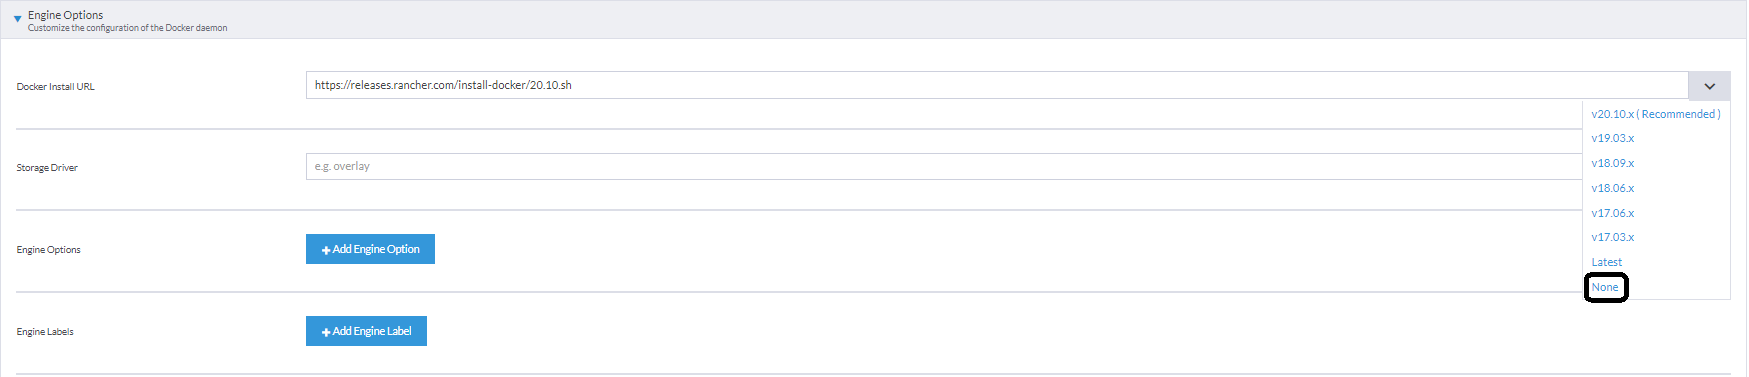
RKE1 downstream cluster nodes in an air-gapped environment:
By default, Rancher tries to run the Docker Install script when provisioning RKE1 downstream cluster nodes, such as in vSphere. However, the Rancher Docker installation script would fail in air-gapped environments. To work around this issue, you may choose to skip installing Docker when creating a Node Template where Docker is pre-installed onto a VM image. You can accomplish this by selecting None in the dropdown list for Docker Install URL under Engine Options in the Rancher UI.
Node Pool Taints
If you haven't defined taints on your node template, you can add taints for each node pool. The benefit of adding taints at a node pool is beneficial over adding it at a node template is that you can swap out the node templates without worrying if the taint is on the node template.
For each taint, they will automatically be added to any created node in the node pool. Therefore, if you add taints to a node pool that have existing nodes, the taints won't apply to existing nodes in the node pool, but any new node added into the node pool will get the taint.
When there are taints on the node pool and node template, if there is no conflict with the same key and effect of the taints, all taints will be added to the nodes. If there are taints with the same key and different effect, the taints from the node pool will override the taints from the node template.
About Node Auto-replace
If a node is in a node pool, Rancher can automatically replace unreachable nodes. Rancher will use the existing node template for the given node pool to recreate the node if it becomes inactive for a specified number of minutes.
Self-healing node pools are designed to help you replace worker nodes for stateless applications. It is not recommended to enable node auto-replace on a node pool of master nodes or nodes with persistent volumes attached, because VMs are treated ephemerally. When a node in a node pool loses connectivity with the cluster, its persistent volumes are destroyed, resulting in data loss for stateful applications.
Node auto-replace works on top of the Kubernetes node controller. The node controller periodically checks the status of all the nodes (configurable via the --node-monitor-period flag of the kube-controller). When a node is unreachable, the node controller will taint that node. When this occurs, Rancher will begin its deletion countdown. You can configure the amount of time Rancher waits to delete the node. If the taint is not removed before the deletion countdown ends, Rancher will proceed to delete the node object. Rancher will then provision a node in accordance with the set quantity of the node pool.
Enabling Node Auto-replace
When you create the node pool, you can specify the amount of time in minutes that Rancher will wait to replace an unresponsive node.
- In the form for creating or editing a cluster, go to the Node Pools section.
- Go to the node pool where you want to enable node auto-replace. In the Recreate Unreachable After field, enter the number of minutes that Rancher should wait for a node to respond before replacing the node.
- Fill out the rest of the form for creating or editing the cluster.
Result: Node auto-replace is enabled for the node pool.
Disabling Node Auto-replace
You can disable node auto-replace from the Rancher UI with the following steps:
- Click ☰ > Cluster Management.
- On the Clusters page, go to the cluster where you want to disable node auto-replace and click ⋮ > Edit Config.
- In the Node Pools section, go to the node pool where you want to enable node auto-replace. In the Recreate Unreachable After field, enter 0.
- Click Save.
Result: Node auto-replace is disabled for the node pool.
Cloud Credentials
Node templates can use cloud credentials to store credentials for launching nodes in your cloud provider, which has some benefits:
Credentials are stored as a Kubernetes secret, which is not only more secure, but it also allows you to edit a node template without having to enter your credentials every time.
After the cloud credential is created, it can be re-used to create additional node templates.
Multiple node templates can share the same cloud credential to create node pools. If your key is compromised or expired, the cloud credential can be updated in a single place, which allows all node templates that are using it to be updated at once.
After cloud credentials are created, the user can start managing the cloud credentials that they created.
Node Drivers
If you don't find the node driver that you want to use, you can see if it is available in Rancher's built-in node drivers and activate it, or you can add your own custom node driver.
RKE2 Clusters
Rancher v2.6 introduces provisioning for RKE2 clusters directly from the Rancher UI. RKE2, also known as RKE Government, is a fully conformant Kubernetes distribution that focuses on security and compliance within the U.S. Federal Government sector.
For RKE2 cluster templates, please refer to this page for additional information.
Node Roles
The RKE2 CLI exposes two roles, server and agent, which represent the Kubernetes node-roles etcd + controlplane and worker respectively. With RKE2 integration in Rancher v2.6, RKE2 node pools can represent more fine-grained role assignments such that etcd and controlplane roles can be represented.
The same functionality of using etcd, controlplane and worker nodes is possible in the RKE2 CLI by using flags and node tainting to control where workloads and the Kubernetes master were scheduled. The reason those roles were not implemented as first-class roles in the RKE2 CLI is that RKE2 is conceptualized as a set of raw building blocks that are best leveraged through an orchestration system such as Rancher.
The implementation of the three node roles in Rancher means that Rancher managed RKE2 clusters are able to easily leverage all of the same architectural best practices that are recommended for RKE clusters.
In our recommended cluster architecture, we outline how many nodes of each role clusters should have:
- At least three nodes with the role etcd to survive losing one node
- At least two nodes with the role controlplane for master component high availability
- At least two nodes with the role worker for workload rescheduling upon node failure